Quick messages are pre-established interactions such as: greetings, farewells, thank yous, etc., that you can send, typing in only a part of the sentence.
Using quick messages is very easy, below we will show you how to: create, search and edit them, let's begin: 🤓
How to create a quick message
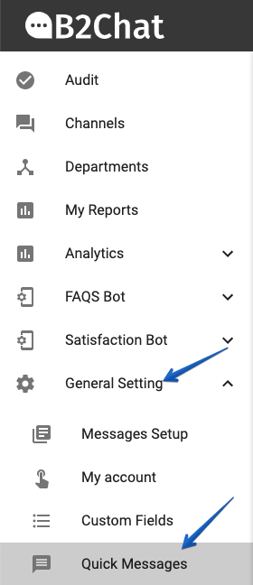
Step 1: Enter the B2Chat application with your user and look for the option: "General setting" located on the left-hand side of your screen and click on the button: "Quick Messages"👇
Step 2: Click on the green button "Create" located at the top right of your screen.

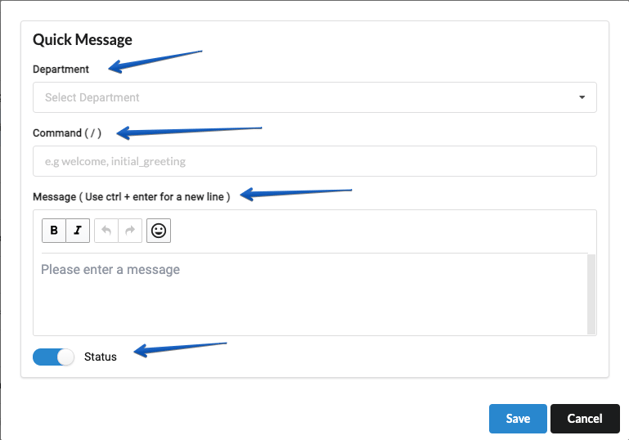
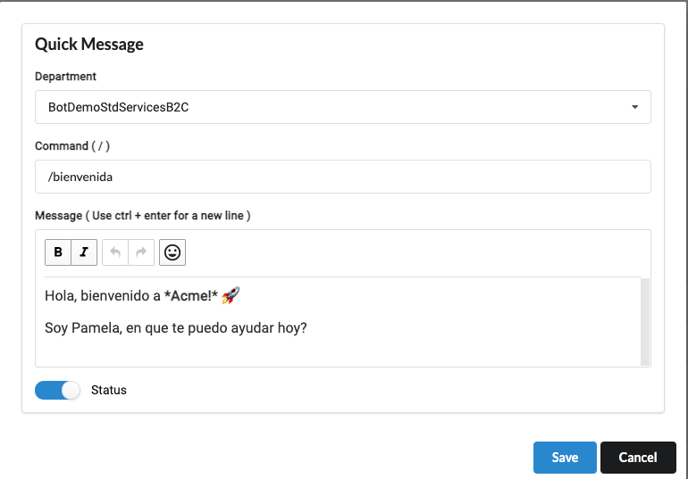
Step 3: You will see a pop-up window where you can enter your message information. Complete the fields with the department that will use the message and the command with which the message will be sent (this field must include the character (/) and a word that defines the category for your message such as Greetings, Farewell, etc.)
Type in the message that you want to be shown to your contacts when they digitalize the command. ✍️
In this message, you can use different styles such as bold, Italic, and add emojis to give your messages their own characteristic.
ℹ️ Keep in mind that what you type in must be in accordance with your brand's tone and should be general enough so that it can be used in different types of communication
Once you're satisfied with your message, activate it by sliding the blue button 🔵 in the option: "Status".
To finish, click on the blue button"Save" 💾 .
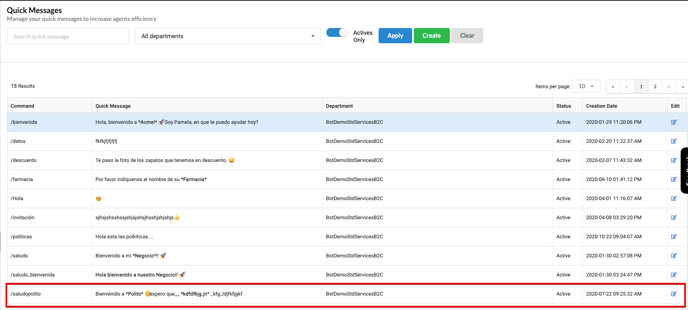
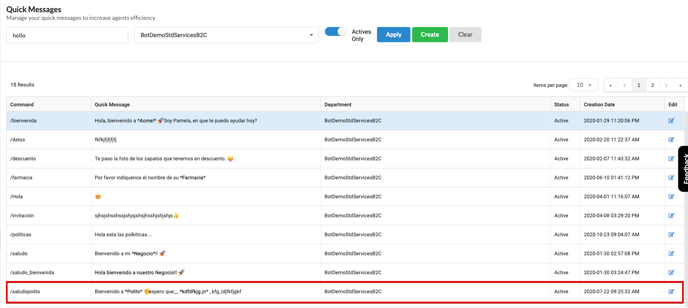
Step 4: If your message was created correctly, you will return to the main screen and there you can view your new quick message.✔️
How to find a quick message
Step 1: Enter the B2Chat application with your user and look for the option: "General setting" located on the left-hand side of your screen and click on the button: '' Quick Messages "👇

Step 2: Once inside, you will see on the screen the list of quick messages that have been created for your company, the commands with which they are activated, the departments to which they belong, their status, the date they were created, and the option to edit them. 👨💻
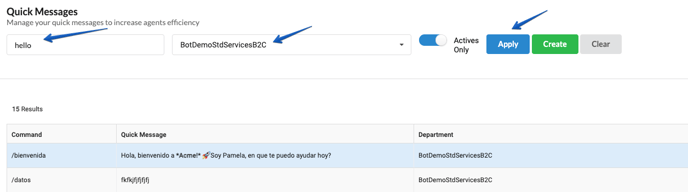
Go to the search bar located on the upper left-hand side of the screen and type the command or a word that is part of the message you are looking for. Then, click on the blue button 🔵 called: "Apply".
Step 3: On your screen, you should see all the messages that contain the word you are looking for. At this point, you just have to select the one you are looking for and perform the action you want.
How to edit a quick message
Step 1: Enter the B2Chat app with your user and look for the option "General setting" located on the left-hand side of your screen and click on the button "Quick Messages "👇

Step 2: Select the message you want to modify and click on the option "edit" located on the right side of the form.
Step 3: You will see a pop-up window with the fields that you can modify, make the changes you want, and once you're done, press the blue button: "SAVE" 🔵 located at the bottom of the window.
Step 4: If your message was edited correctly, you will return to the main screen and there you will be able to see the changes you've made.
Some final tips
To get the most out of your quick messages, it is important to know in detail each option that the B2Chat console offers.
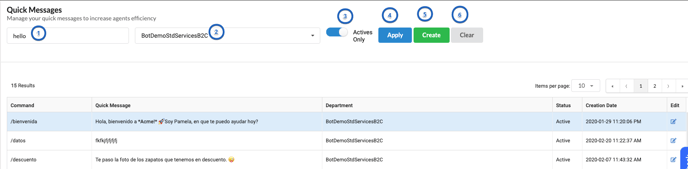
👍 Below we will explain what each button is meant for and how you can easily identify it:
- Search bar: Here you can enter the name of the command or a word of the specific quick message you are looking for.
- Departments' list: Here you can see all the departments that you have associated with your business.
- Actives only: This button shows only the messages that you have active. If you wish to see them all, you will have to deactivate it by sliding the button to the left.
- Apply: This button will help you search for quick messages after entering information in the "search bar".
- Create: Here you can create quick messages that you are going to use for different departments.
- Clear: Here you can clear the fields when you wish to perform a new quick message search.
This is how quick messages for your agents are created, searched, and edited, we hope this information was useful for your company, thank you for being a part of B2Chat. 🤗