Being able to automate your chats' responses saves you valuable time and allows you to unify the tone of communication that characterizes your brand. Learn how to manage B2Chat automated messages here.
With B2Chat's automated messaging, you can predetermine the messages that your client receives when: they are greeted 👋, cannot be attended at the moment, are serviced by an advisor, are required to wait, ⏰ or are given a farewell.
Automated messaging not only saves you time but also allows you to reflect your brand's personality 😎 and unify your messages so that your client identifies your company from the first word.
Learn how to set up your automated messages by following these 👇 simple steps:
Set up automated messaging
⚠️Note: Keep in mind that, to set up your automated messaging you must have an administrator user account.
Step 1: Log into B2Chat with your username and password🔐.
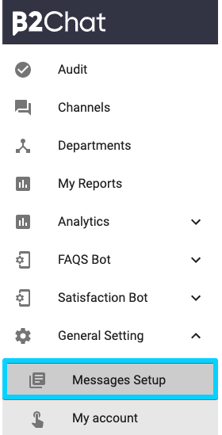
Step 2: Click on the General setting module, located at the bottom left of your screen.
Step 3: Click on the sub-module: "Messages Setup".

Step 4: Once inside the module, you will find the filter: "Departments" in it you select the department 🔎 to which you wish to set up your messages or if you want to have the same messages for all your businesses, all you need to do is select the option: “If department is disabled ".

Note ⚠️: Bear in mind that, with B2Chat you can differentiate automated messages according to department, so depending on the area that your client chooses, they will be able to receive different types of messages. To do this, you just have to individually set up your departments's messages and have your departments activated ✅.
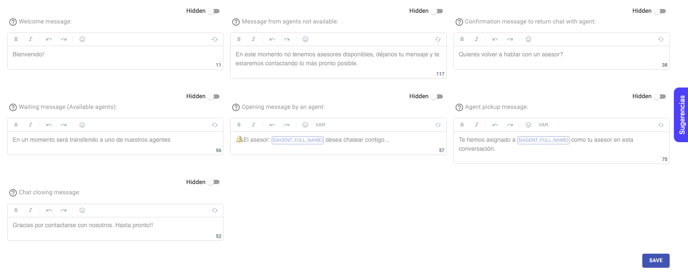
Step 5: Once you've selected the department to which you want to set up your messages, you will see six text boxes with the different types of messages 💬 that you can set up. These messages are:
- 👋 Welcome message: this is the text that your client will see after sending their first message, in it, you can present your company so that later your chatbot can display the available options to your client.
- 😅Message of unavailable agents: This is the text that your client sees when they message you and our system detects that there are no agents available to assist them. Normally, this type of message makes reference to your company's operation hours or a request to leave a message to be serviced later.
- 👍 Confirmation message to return to advisor: this message prevents a very common situation in your chats; When an advisor closes a conversation with a client, it is very likely that the client will type in a farewell or thank you message. For this reason, the text that goes in this field is sent 30 seconds after closing the conversation and its purpose is to verify if the message sent by the client is a new request or is simply a farewell message.
- ⏰ Message waiting (Agents available): This is the message that your client sees when they message you for the first time and our system detects available agents. It is advisable to type in a message that refers to wait time so that the client understands it will be a short while before they are serviced.
- 👨💻Opening message by the advisor: this is the message that your client sees when your advisor picks up the chat. it is advisable to include the agent's name in the message.
- 👋Chat closing message: This is the text that your client will see when the agent decides to close the chat from the B2Chat console. It is important that this message is used to notify your client that the conversation has ended because if they return to the conversation, they will be serviced by a chatbot until another agent picks up the conversation again.
 Once you've learned what each type of message is intended for, you will only have to click on each text box and type in ✍️ yourself the message you want. Remember to take into account your brand's communication tone and the specific times when your messages will appear.
⚠️Note: B2Chat has loaded automated messages with default text, if you want to change the default text, you only have to modify the text that appears in each type of message, remember that you can use: emoticons, bold italics, underlines and whatever is necessary to reflect your brand's communication tone 👍.
Step 6: Once you're done editing your automated messages, click on the blue button 🔵 "Save changes" to apply your changes and that's it!
