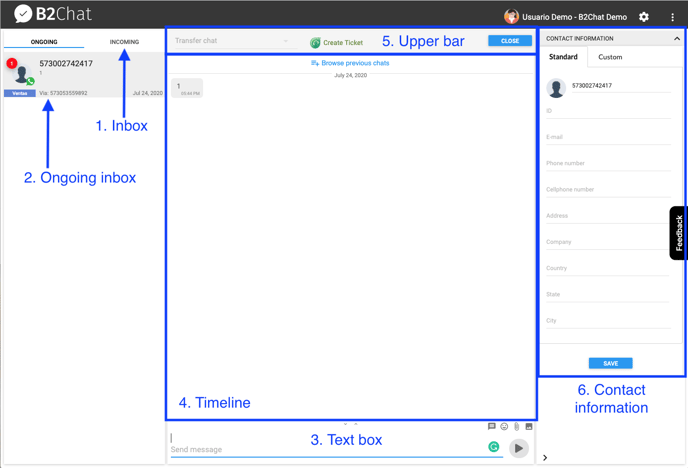
The B2Chat console is the screen that allows communication between the agent and contact through the use of different messaging platforms.

Sections
The B2Chat console is divided into different sections and each one plays an important role for the agent. In this article, we will be introducing guidelines for each of them.
- Inbox. The inbox 📥 is a shared area within the console (agent's screen) where all chats 💬 sent by contacts appear. The inbox is viewed by all agents.
- Ongoing inbox. Chats 💬 that an agent selects from the inbox 📥 are moved to the ongoing inbox. These chats 💬 can only be viewed by the agent.
- Text box. Agents can reply to incoming messages 📩 by typing in the Send message area found in the text box at the bottom of the console.
- Agents can also increase the size of the text area by clicking on the arrows ⬆️⬇️ at the top. They can add images 🌁 , emojis 😉 , and files 📂 to their messages and there's even the option of sending voice notes by clicking on the microphone 🎙️ icon next to the text area.
- Another important feature within the text box is the ability to send quick messages. This feature is there to help the agent reply to important messages swiftly.
To set up quick messages, click on General Settings in the menu located on the left side of the platform; then click on Quick Messages. Once inside Quick Messages, you can create personalized messages ✉️ by placing a / in front of each one. This option makes it possible for you to manage and personalize your messages ✉️ in order to increase agent productivity.
- Timeline. The timeline is located in the center of the console and shows real-time conversations between agents and contacts 👥 .
- To view conversation 🗣️ history, use the scroll bar (on the right side of the timeline). By scrolling through the timeline, you will see the dates in which each conversation took place. You can also click on Browse previous chats to have a full view of all previous conversations.
- Messages ✉️ sent by agents appear on the left-hand side of the timeline while messages sent by contacts 👤 appear on the right.
- Upper bar. The upper bar located at the top of the console executes several tasks including the transferring of messages ✉️ to other departments. This feature helps agents 👥 provide much more personalized and effective customer service. To transfer a message ✉️ , the agent clicks on the drop-down box on the upper left-hand side of the console.
- Our console is also merged with FreshDesk y Zendesk, CRM platforms (Customer Relationship Management) that help with the creation of tickets 🎫 , incident management and serve as assistance tools for the agent.
- To close a conversation click on the Close button found on the upper - right-hand side of the console (Note: If a contact wants to reach an agent again, a new conversation will open).
- Contact information. Contact information 👤 can be found on the right - hand side of the console and it's divided into two types of data: standard data and customized data.
For standard data, the agent must fill out the required fields with the contact's 👤 name and mobile phone number. To add and customize fields, click on General Settings (you can find it in the menu on the left - hand side of the platform) and select Custom Fields. Once there, click on Create new field.
