Before creating a new user, you must first verify that you are listed as an administrator in your B2Chat account. Only administrators have access to the Users option within the platform and can manage or create new users.
To create a new user, follow these steps:
- Click on Users located in the menu on the left side of the platform.
- Once in Users, you will notice that there are three different statuses for users: active ✅, inactive 🔴, and to activate ⚪. If you click on each one, our system will filter the statuses for each user you've created.
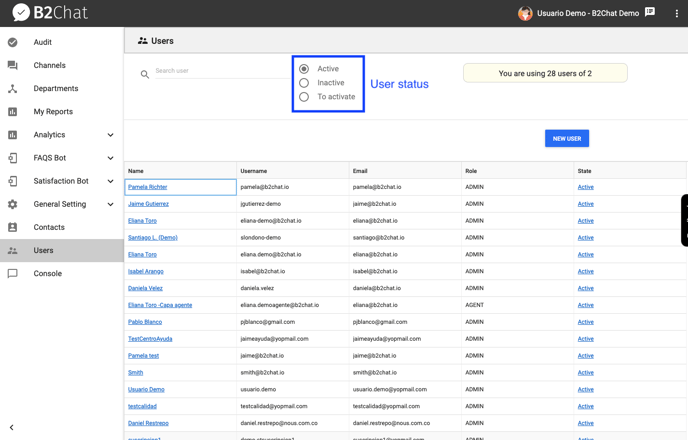
- If you wish to create a new user, click on the blue button that says New User.
- Depending on your subscription plan, you can upgrade to a plan that better suits your business needs or create an additional user. If you want to upgrade your subscription plan, click Upgrade or click Create additional user to create a new user within your current subscription plan.
- Depending on your subscription plan, you can upgrade to a plan that better suits your business needs or create an additional user. If you want to upgrade your subscription plan, click Upgrade or click Create additional user to create a new user within your current subscription plan.
- If you decide to upgrade your subscription plan, our system will redirect you to our list of available subscription plans. Click on the subscription plan that best fits your company's needs and click Update Plan.
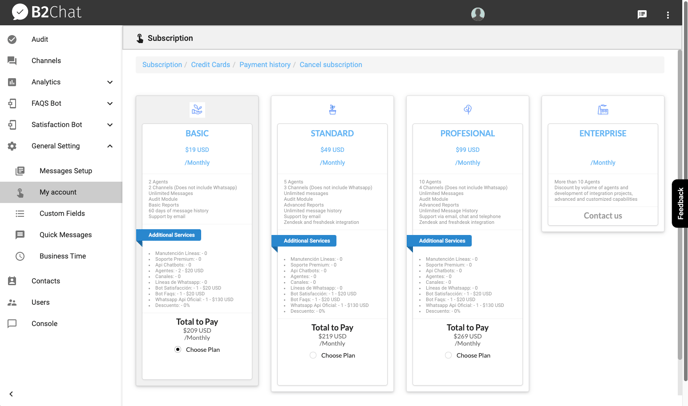
- It is important to note that each of our subscription plans offers a limited number of users. However, our plans offer the possibility of adding more users to your account, bearing in mind that each new user that you add to your account has an additional fee of ten dollars 💵.
- For example, if you decided to opt for our Basic plan, it would include two agents 👥 with the possibility of adding more agents to your account, each with an additional fee of ten dollars. The Standard plan includes five agents 👥, the Professional plan includes ten agents 👥 and our Business plan includes more than ten agents 👥 with discounts for agent volume.
- In B2Chat, we highly recommend our Professional plan because it allows you, as a company, to provide your clients with a much more complete service at a reasonable price.
- It is important to note that each of our subscription plans offers a limited number of users. However, our plans offer the possibility of adding more users to your account, bearing in mind that each new user that you add to your account has an additional fee of ten dollars 💵.
- If you decide to create a new user within your current subscription plan, a form📝 will appear on your screen 🖥️. You must fill out the form with your new user's contact information (name, email address 📬, username, mobile phone 📱, and the user's role). All fields are required. Once complete, click on the Save button 💾.
- When the new user is created, its current status is To activate ⚪. The user will receive an activation email 📬. To activate the account, the user must click on the blue link that says Activate account.
- The user must fill out the form with the required fields (name, email, telephone, username and password) and add an avatar👤 by clicking on the Choose File button. It is important to add an avatar to the profile to make it easier to identify each user. In the same way, it is imperative that all passwords have a minimum of 10 characters, a lower case, an upper case and a digit. Example: M1Contr4sen4.
- Once the user has activated their account, it should appear in the list of users with an active status ✅.
- To verify that the account has been created correctly, click the active button ✅. If the username does not appear on the list, click the To Activate⚪ button to filter by users that have yet to be activated. If it appears on the list, click on the blue link that says Resend invitation (located next to the user's status) and the user will receive a second activation email.
💡The username you choose must be unique, this name is commonly an abbreviation of the user's full name or alias
💡In B2Chat we recommend that the email address 📬 you enter is valid so that you may receive our notifications and can update your password when you see fit
ℹ️ To change a user's status, simply find the user's name and click the blue link under Status (located on the far right). Our system will ask you to confirm the status change, click Yes to change the user's status