To begin using Business Time 🕐, click on General Settings ⚙️ (located in the menu on the left side of the platform) and then click on Business Time. Once there, you will be able to set up how you wish to inform your clients of your customer service availability. Currently, we have two modes of operation: when there are no agents online or available 🚫 and by hours 🕐.
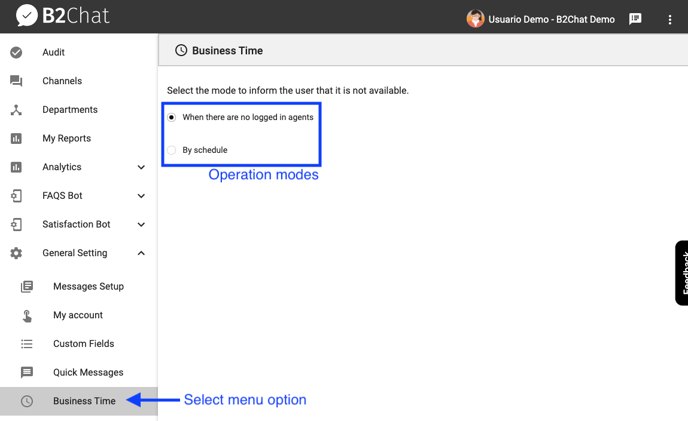
When there are no agents online
This mode is useful for companies or businesses that have a more flexible schedule. This means that instead of setting up a range of hours, our system simply checks if there are agents connected. If there are agents 👥 online, our system will allow the chat 💬 to go through; if there are no agents online 🚫, an automated reply message ✉️ will be sent to the customer to let them know that there are no agents available (🔜 we'll show you how to set up your automated reply messages later). This is a default mode if you wish to use this mode of operation, leave it as is and continue to set up and customize your automated reply messages ✉️.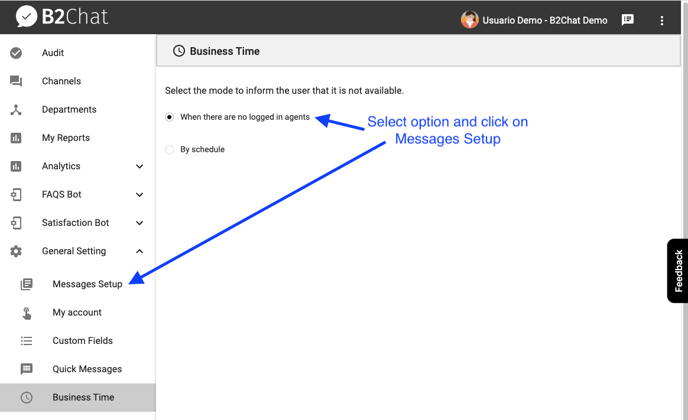
ℹ️ To customize your automated response messages you must click on Messages Setup
By Schedules
This mode works well with companies or businesses that have established hours. To customize your schedule, start by clicking on By schedule and check the boxes ✔️for the days you will have agents available ✅ and also choose the range of hours that best suits your company's agenda🗓️. If you want to add more hours, you can do it by clicking the➕button. You can add up to three different time ranges and delete them whenever you want. To apply the changes you've made, click on the Save button 💾.
❗It is important to check that the time ranges you choose do not overlap with each other
Holidays
Under Set business times, you will find the option Set holidays. Click on the calendar 📆 and choose the date you want to schedule. You can schedule as many holidays as you need by clicking on the Add button. Then choose the time range that best fits your company's agenda 🗓️. If you want to add more hours, click the➕button. You can add up to three different time ranges and delete them without any issues. Do not forget to verify that the time ranges you choose do not overlap with each other. To apply the changes you've made, click the Save button 💾.
How to set up schedules by departments
If you have departments activated, you can set up schedules 🕐 for each one. Simply click on General Settings ⚙️ (located in the menu on the left side of the platform) and then click on Business Time. Select the department for which you want to set a schedule from the drop-down list. Remember that you can choose between our two available modes of operation: when there are no agents online or available 🚫 and by hours 🕐. The process is the same as explained above (see previous paragraphs👆) except for the additional feature of being able to copy schedules from one department to another. To do this, simply choose the department you want to copy a schedule to and click Save 💾.
How to set up your automated reply messages
Customizing your automated response messages ✉️ is a great way to help your business meet customer support expectations. Automated response messages allow you to maintain transparent communication with your customers and stay connected 📶 even when there are no agents 👥 available 🚫 or a message comes through outside of a set schedule. To set up your quick reply messages, click on Messages Setup located in the menu on the left side of the platform. Our system allows you to set up and customize different types of quick messages including:
- waiting messages (when agents are available ✅)
- messages from unavailable 🚫 agents
- welcome messages
- opening messages by an advisor
- confirmation messages (to return a chat 💬 with an advisor)
- chat closing messages 💬
You can also make use of the different functions that we have available such as adding emojis 👍🙂 and changing the font styles to bold or italic. Once you're done, click on Turn Off / Turn On to enable or disable your quick messages. To apply the changes you've made, click the Save button 💾.
ℹ️ If you wish to restore your custom messages to our default messages, click on the blue link that reads ➡️ Reset default message located under each message option