How to create a Livechat channel
To create a Livechat channel 🌐 follow these steps:
- Click on Channels in the menu on the left-hand side of the platform.
- Click on the Livechat icon 🌐 located next to where it reads: "Connect a new channel".
- Each of our subscription plans has a limit to how many channels you can add. If your current subscription plan does not allow you to create additional channels, a window will appear asking you to create an additional channel or update your subscription. Remember that each additional channel has an added cost of ten dollars 💵 (to learn more about our different subscription plans, see How to verify my subscription)
- To upgrade your subscription, click on the Upgrade button and choose the plan that best suits your company's needs.
- To create an additional channel, click on Create additional channel and our system will redirect you to the settings page ⚙️ .
How to set up your Livechat account
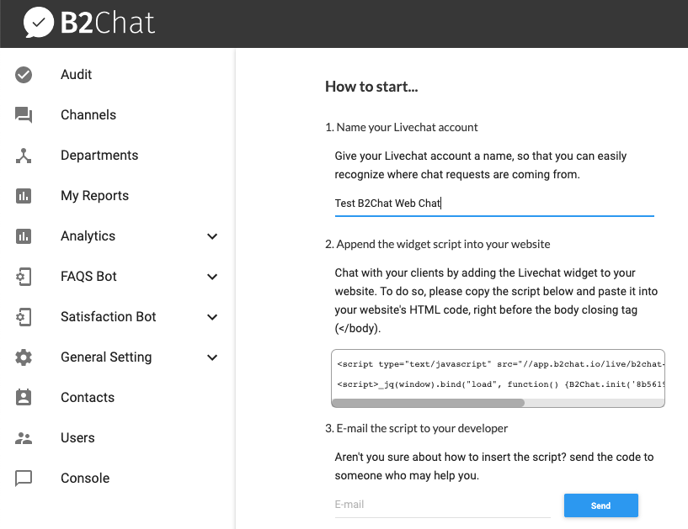
On the settings page⚙️, you will begin by following the setup steps outlined in the section titled: How to start.
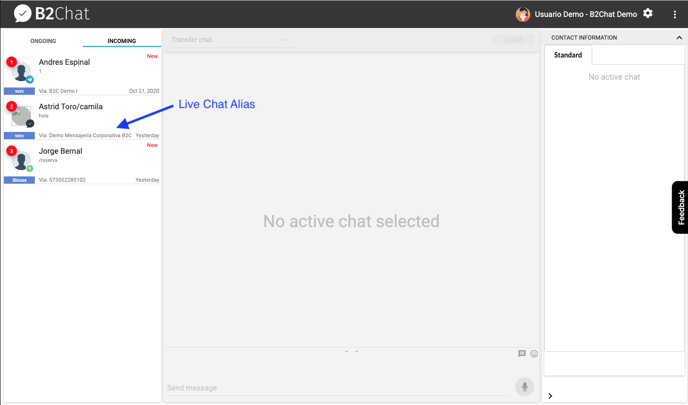
- To set up your Livechat account 🌐 you must first choose the name you will give to your new channel. This step is extremely important because the name you choose will be used to identify the specific channel for the Livechat account that you will create. You must define a name or alias for the live chats that correspond to each of your websites (in case you have more than one). The name or alias you decide on will appear on our console, when an agent picks up a chat from the inbox 📥 they will easily identify it.
- Embed the widget on your website. In order to chat with your clients, you need to insert the script below 👇 on your website. Copy the script and embed it into your website's HTML code, just before the tag that closes the body </body>.
- Send an email to your developer👨💻. This step is optional. If you are not sure how to embed the script, send the code to someone who can help you.
Widget configuration
In this section, you will have the opportunity to set up your widget's general features. If later you decide you wish to change or add something to your widget, you can go back and set up more features without any issues.
- Select the image 🌆 you wish to use for your widget. This image refers to the button that users will click on to open a chat 💬. The image you upload must be in png format and should have a transparent background. It is recommended that the image is not heavy.
- Select the image 🌆 for the pre-chat feature. When you enable the pre-chat feature, the first thing the contact will see is a data request form, this form must be filled out by each contact who enters your website for the first time. This way, the agent who receives the chat 💬 in their inbox 📥 will be able to see the client's contact info.
If you choose to not enable this function, the contact will appear as anonymous on our console and the agent who picks up the chat will be required to ask for their contact information.For this reason, it is recommended that the image you upload is your company's logo. The image must be in png format and should have a transparent background. It is recommended that the image is not heavy. Please keep in mind that the image's frame will be round ⭕ before selecting it. - In this step, you can change the widget styles to your liking. You can select the color for the header by clicking on the button next to the title Choose a color or type in the hexadecimal for the color you want. Example: # 373737 To find the hexadecimal for each color, click on this link 👉 https: //en.wikipedia.org/wiki/Web_colors . You can also customize the margins in pixels (right and left) in order to position the livechat 🌐 on your website to your liking.
- If you wish, you can customize the different texts that will appear in your livechat (title, pre-chat text, and welcome message) to your liking. The title text refers to the text that appears in the header, therefore, it is recommended that you place your company's name in this area. The pre-chat text is the message that appears in the header under your company's name (eg, give us your details to contact an advisor). If you wish, you can also set up a button for your company's ☑️ terms and conditions along with a link to your company's policy document, if you wish to add this feature contact our support team at support@b2chat.io. Finally, the welcome message is the text that the contact👤 will see once the chat has initiated (Eg Welcome, how can we help you).
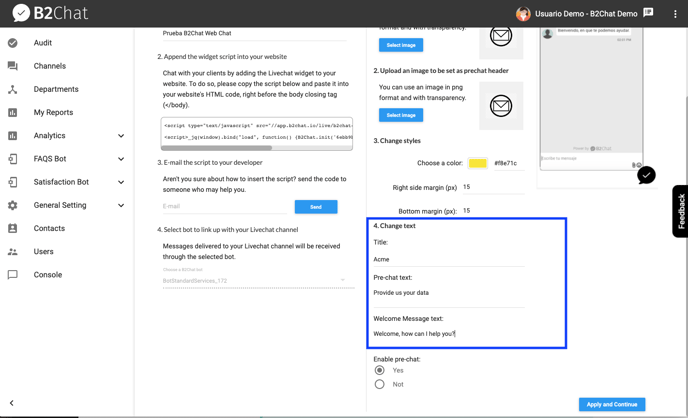
- If you want to enable the pre-chat function, click the Yes button.
- Once you are satisfied with the changes you've made, click on the Apply and continue button and our system will show you the following message: Done! Your new account has been setup and will be activated shortly. Click the Go to console button to finish.
ℹ️ Remember to embed the widget on your website, if you are not sure how to insert the script send the code to someone who can help you
ℹ️ Once you've embedded the widget on your website, new chats will begin to appear on your console